![]()
![]()
![]()
![]()
![]()
|
| Please Support our Sponsors |
 |
 |
||
 |
|
1/72 Revell-Dragon
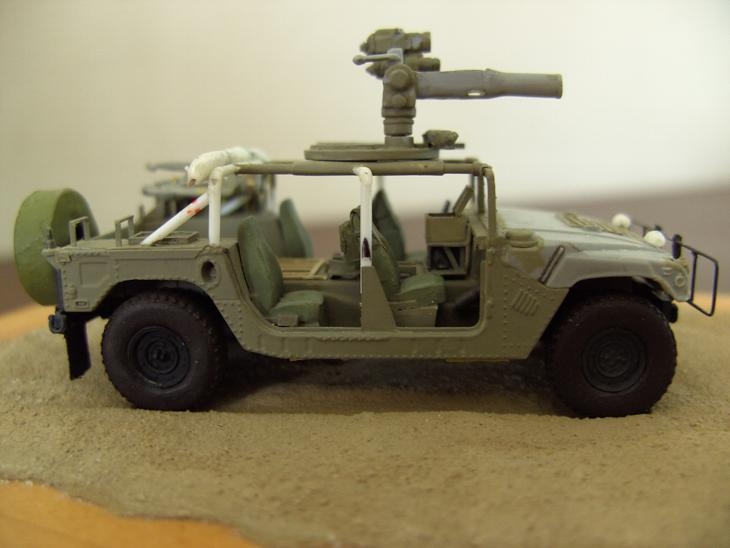
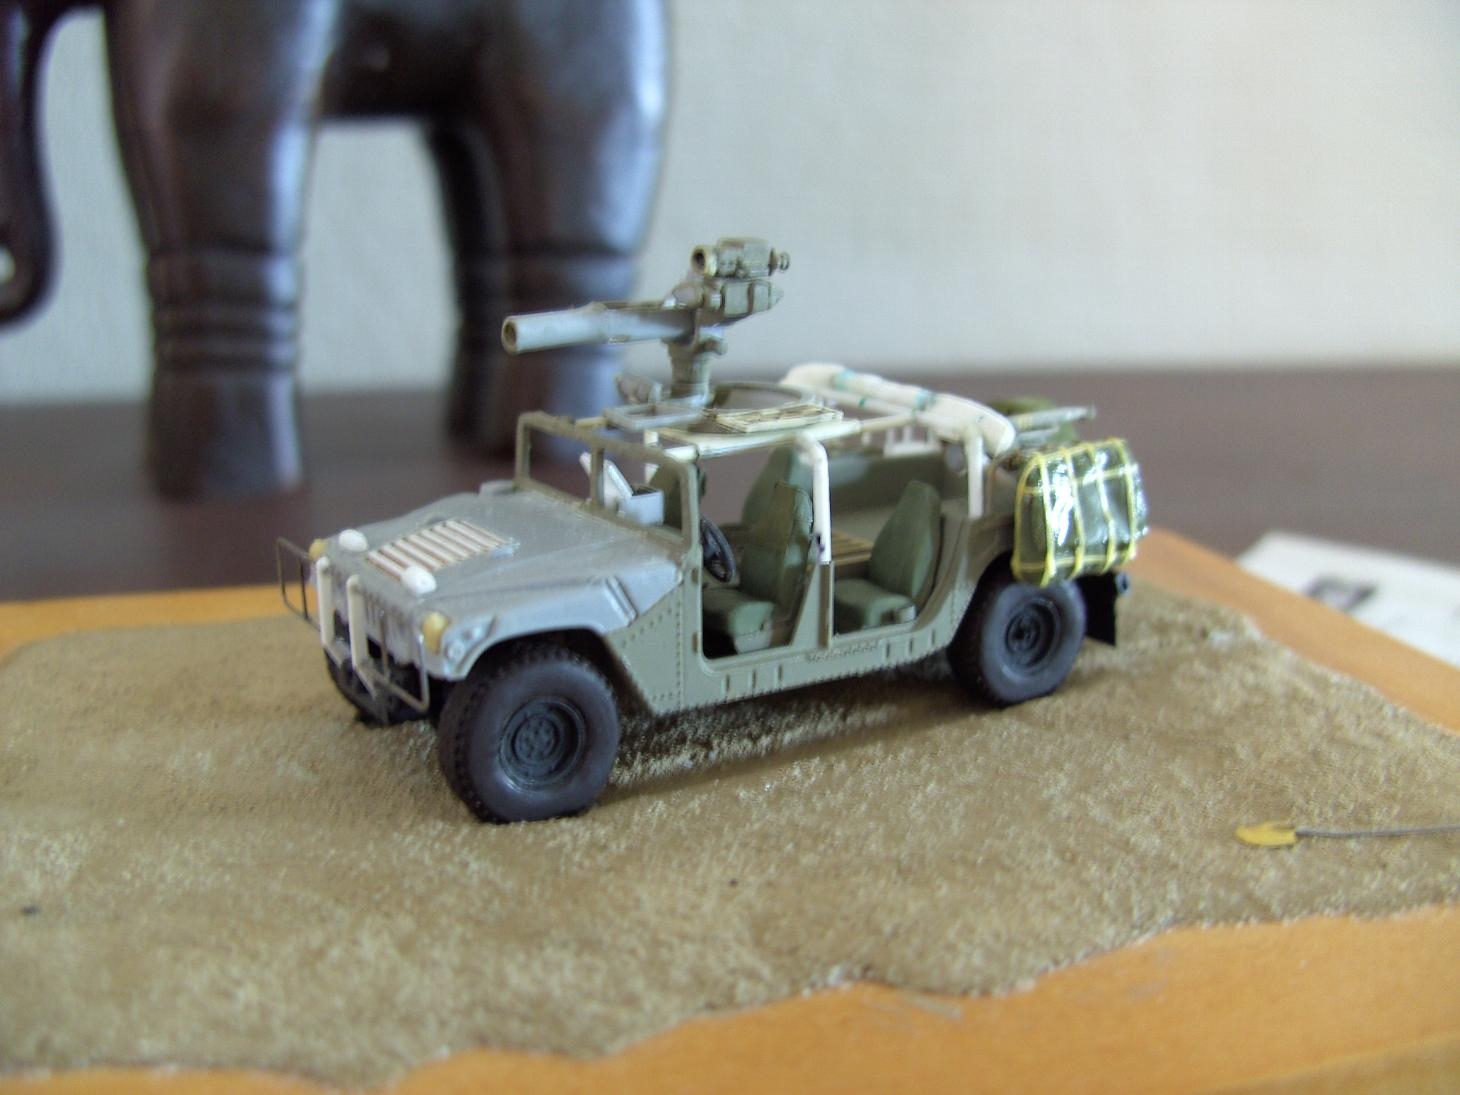
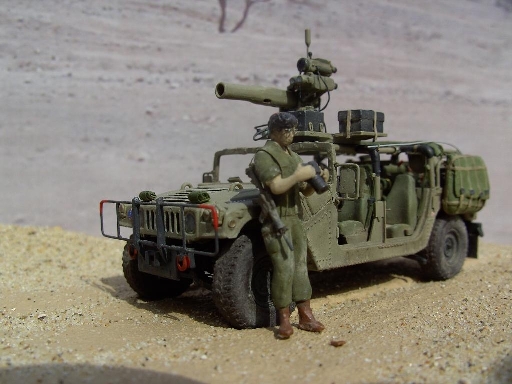
IDF HAMER OREV

HUMVEE TOW-Carrier
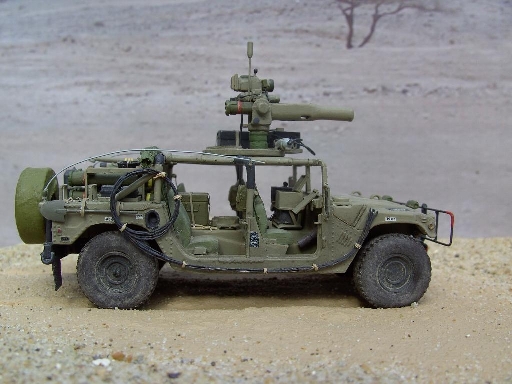
By Erik Hendriks - Sittard, Netherlands
|
Photos
|
|
Revell and Dragon models compared With the appearance of the Revell and after that the Dragon issues of the HMMWV in 1/72nd scale, I decided on buying both, creating a nice opportunity for some comparing. When the Dragon offering was released a couple of months after the Revell model, the whole ‘Braille Scale’ community went crazy. People claiming it was much better than the previous model from Bünde. Revell offers ‘only’ one kit of the HMMWV. For this project and for the sake of comparison, I decided on buying the M1045/M1046, which has the TOW-launcher. Both Revell and Dragon offerings come packed in pairs, which is reasonable.
After some careful comparing, I found that the Dragon offering wasn’t that much better than the one from Revell and the truth was, as usual, somewhere in between. I decided to look for ‘between’ and take the best of both worlds.
The main draw back on the Revell offering is the amount of detail on the hood. The bars of the radiator are too heavy and as a consequence only has five of the, where there should be eight. Also, compared to the Dragon offering, the details on the hood aren’t represented that sharp, but still very nice. One plus is that Revell offers the indicator lights as separate parts, where those of Dragon are casted in the hull/ hood part.
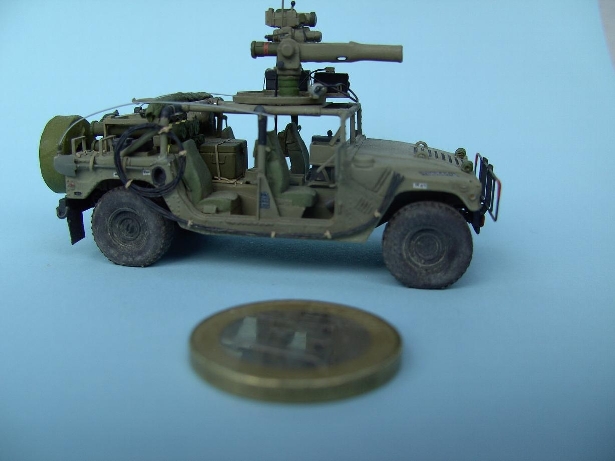
On the positive side, the Revell chassis is magnificent. It comprises of some 15 parts. We’re talking a 7 centimetre / 3 inch model, here! The Dragon model’s chassis is not as nicely detailed, a lot of small parts are moulded in a way that the detail on the sides is not as crisp and a lot of parts need cleaning up.
The main draw back for me is that the Dragon offering comes with one regular, unarmored HMMWV whilst the second has the ASK armor kit moulded. This makes half of the box unusable for the IDF (Israel Defense Force) -nut case. One could of course decide on using the ASK version for a Plasan Sasa armored M1025 or M1113 and by doing so, cover the armor suite of the ASK (The conversion is a hell of a job to manage. I talk out from experience, but that’s a different subject).
I must say, the details on the Dragon body are much sharper compared to the Revell kit. The one piece roof with windshield is a blessing if you’re going to build a roofed version.
After some deliberations I decided on using the Revell offering as the basis for my HMMWV as this had more details on the egress- access areas. One part both offerings fail miserably is that of the wheels. As it turns out, neither set of wheels is correct; it is a matter of which has got the least flaws. An almost full account can be read here. As most of you, I’m a sucker for detail and accuracy. I decided that the wheels would not stop me from making a decent Humvee.
I build just about everything, as long as it is in use with the Israeli land forces or has been used by them. So the decision to make an Israeli HMMWV was apparent. On the Internet I found a set from CMK, which seemed to have the right wheels, the ones with the later ‘aggressive pattern’ treads. As I needed them for almost any IDF HMMWV, I ordered the set. I did not know exactly which version I would build, but it would be Israeli, for sure. This set, how ever, did push me toward deciding on the TOW-carrier.
The set itself turned out to be a little less than a disappointment. I finally did decide on the TOW-carrier. As I studied this subject it started to intrigue me. The CMK-offering was way- way off and I somehow got tempted to correct the flaws (of which there were many). More on that later.
The wheels were a bit of a disappointment, too, except for the threads. The hubs come separate and the details for these are PE parts. (I read the aforementioned article only after I bought the detail set) The idea is good, but it won’t work. Also, the tires are without any treads. What’s more is, try to align these parts. The treads come as PE parts as well and have the right pattern. At least I had one part of the solution to decent wheels.
I finally found the wheels (with hubs) in the form of those that were at one time offered by Professional Model (now part of CMK). These had the older pattern treads, but some sandpaper took care of that. I added the CMK-treads to the Professional Model’s wheels and all I now had to do was to adjust the bolt arrangement. Who ever said model building is boring?
Bash it
As both plastic kits had their pros and cons, I decided on taking the best of both worlds and come up with the ultimate HMMWV, at least to this specific place in time, this scale and my budgetary constraints. The chassis parts and the body parts of the Revell model were taken out of their sprues and the same went for the weapons parts, hood and the winch of the Dragon offering.
The chassis parts all fit very good. One has to take ones time here, as these parts must be lined up correctly. The only adjustment I made to the Revell body was the adjustment of the arch of both rear wheel fenders. These droop down somewhat toward the rear, where the should be parallel to the ground.
I decided to place the fuel cap a bit deeper in the hull, cutting out this item and gluing a new item from the other right side of the hull in the kit (remember, it’s a double kit). Most will probably declare me stupid on doing this, but I’m a pretty slow builder and take great joy into making a decent and detailed model. I’m not going for the numbers!!!
Of the Dragon body I only used the hood, which had to be cleaned up slightly. The places where the various facets of the multi-part mould come together (i.e. the sides and the top of the hood) are not lined up 100%, which creates a minor sharp edge. Some 400 grit sand paper did the trick. The main draw back of the Revell hood is the upper vent, which is very crude and misses some braces.
The vent/ radiator on the Dragon part is not 100%. It doesn’t have any braces at all, and thus represents the later type of HMMWV. What I did was, I cut out the radiator vent (just the ribbing, not the outline) and made my own replacement. A small piece of styrene was cut to size so that it would fit in the hood’s hole. I glued some brass mesh wire on this part and bent it to shape. After that I glued seven new braces on the mesh. And voila…
For detail’s sake, I removed the integral casted indicator/ black-out lights and filled the consequential openings with Magic Sculp. After this was shaped and had hardened, I added the Revel lights.
With some minor adjustments the hood fitted to its new hull.
IDF-modifications to the TOW-version
The CMK kit, which claims to represent this particular IDF version, is not very accurate (by a long shot). There’s a large degree of fantasy involved. For instance, I have yet to see the first I.D.F. TOW. carrier with a duffel bag on each side. This is wrong, as is a pedestal mounted M2 .50” MG. What’s more, this model doesn’t have any possibility to stow spare rounds…
The level of the casting is very good and all parts included are nicely moulded. Still, most of it is inaccurate and is unusable, at least for this project. (I bought two sets and my spares box has been happy ever since). I wish more time was spent researching the subject.
The large duffel bag is too high. I fashioned a new rack from which the new duffel bag would be suspended. This rack has to be slightly lower than the roll cage. An all new duffel bag was made, using styrene sheet for the main shape and Magic Sculp (just love this stuff) for the ‘body’. I simulated the texture by soaking a paper tissue in thinned white glue. Once that was dry, I covered it with super glue (keeps the fibres down), made a new lid from the same paper tissue glued to some aluminium foil and made some kind of harness of thin stripes of Tamiya masking tape.
I decided to replace the main roll bar (packed in some kind of simulated camo-netting) by bending some 1.0 mm stock plastic rod in shape. The vertical braces between the wind shield and the rear roll bar were made by bending 0.8 mm stock plastic rod.
The roll cage is fitted to the wind shield, which is not a wind shield in this version, as it doesn’t have any windows. This also goes for the other two open top HMMWV versions, namely the Hamer Siyur and the Hamer Galit.
On the right side of the vehicle, thin rolled up piping is tied to the side. This tubing is used to create a structure, over which camo netting can be laid. This was made from very thin metal wire, tied together with copper wire.
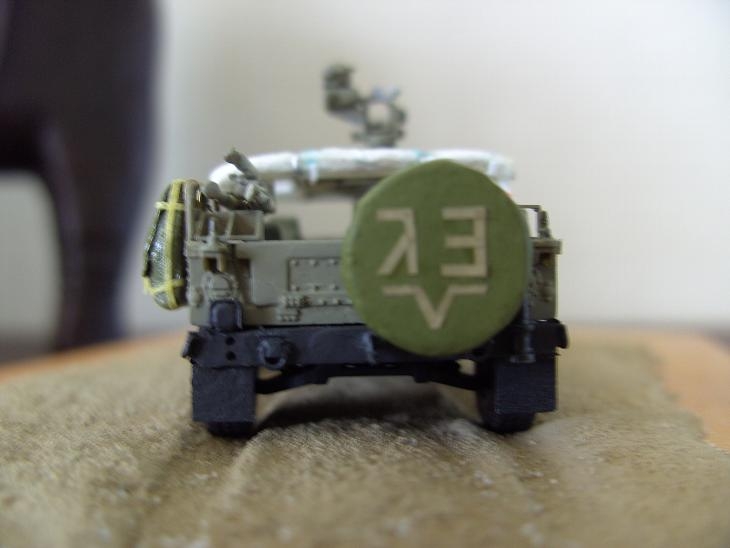
The Israeli HMMWV’s are out fitted with a rear bumper. To the bumper a rack is attached to store the spare tire. The bumper and the rack were taken from the CMK kit. The spare wheel was wrapped in tissue paper, soaked in diluted white glue.
Orev
The weapons station platform between the wind screen and the rear roll bar was sanded down so that only the mount remained. I enlarged it by gluing 0,10 mm thick card over it and cutting it in such a manner that the front and rear were extended by some 1.5 mm. The weapons station was replaced by the Dragon offering, which has sharper details compared to the CMK-part. The triangular brace on the left side of the weapons station was cut off and a new tray was built for the stowage of the large black collimator box.
The TOW launcher was finally taken from the Dragon kit. The CMK offering could have been used just as well, but somehow I decided against it. Both are very nicely detailed and both have a separately moulded TOW. round that can be fitted optionally.
The Dragon launch tube is moulded shut in the barrel, logically. I drilled it through and sanded and ground it until the diameter was to my liking. I did correct the barrel slightly as the transitional area between the barrel and the chamber was too rough. I added some Tamiya body putty and sanded it smooth.
I further enhanced the launcher assembly by adding some bolts and improving the sights. The IDF vehicles also have an antenna sticking out on top, being situated between the sights and the launch tube. This is part of the GPS- receiver and was also added. In front of the launcher and to the right of the control box I made a pressure bottle from plastic rod and stretched sprue. The wiring was made from copper wire.
For accuracy’s sake, I cut off the control box and glued this to a plastic card base, cut it out and glued it back on the ring. I hate “look-throughs”. The control box was detailed by adding bolts to two sides as well as some PE handles. The control box was ‘attached’ by four clips to the sides of the box and its base.
For anyone actually wanting to build this model, too (or any other TOW-carrying vehicle for that matter) make sure that, while on the move, the optical devices are stowed until the system reaches its anticipated target area.
The Interior
I started off with cutting off the radio and its mount, as these are casted as an integral part of the hull. The gaping hole was filled with plastic card and putty and sanded smooth after that. The radio mounting is the standard HMMWV fitting, where the radio is placed on the bottom part. On the top shelf is a box (with a lid) for the commander’s maps and utilities. The radio itself is of an unknown type (to me) and is probably of Israeli design. I managed to get some information on it and built it, using plastic card and some PE parts from a cockpit detailing set. In addition there is a clip board in front of the commander to hold maps.
The Revell seats were replaced by the CMK offerings, as these depict the IDF style with the high back rests. After the cushions had been sanded to give a used and worn appearance, these were installed. The two forward seats were fitted with a cover that holds a small bag on the rear. This was made from old resin duffel bags that were modified and glued to covers, which were fashioned from cigarette paper.
Beneath the weapons station, an upward folding platform is placed between the two forward seats. The item came from CMK and shortened a bit. Although in real life, this platform can be raised; in the field this is hardly ever done. I simply glued it into place, after I contemplated on raising it. Between the two rear seats, a large storage boxes is placed. Well, at least according to my reference. One of these boxes carries the T.A.S. (the thermic device) while on the move. I made one from scratch, doing my utmost best to make it look like a cooling box.
To each seat in the interior comes a bracket for holding an M16 style rifle upright. It consists of two parts, one is the platform into which the butt is placed, the other is a simple clip. These brackets are hardly ever used, but remain just the same. I built these from metal foil and plastic.
Each crew member is protected from falling out of the vehicle by a strap that is connected to the roll cage. I made these straps from lead foil. The same goes for the safety belts.
Next to the commander’s seat is a rectangular frame. Behind this frame is a circular frame that is designed to hold the adaptor for the launch tube and sights. In real life, the adaptor remains in place on the gun ring and hardly ever comes off.
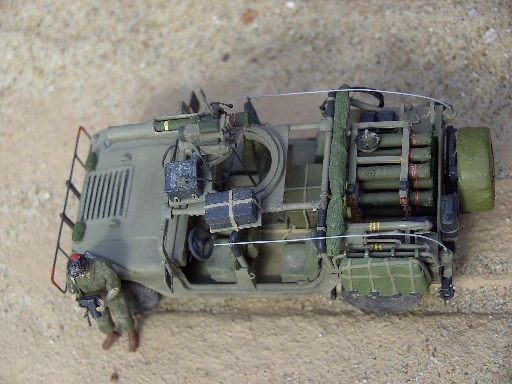
In the trunk the only things that are built-in is a bracket for a jerry can, a frame for TOW rounds (called the hive in IDF parlance), a connector for the tri-pod. The rest of the equipment (spare batteries, bags etc.) are just thrown in the back or in the big duffel bag that hangs from the left side.
On the rearmost area of the left wheel well there is a rack that appears to be designed to hold two ammo cans. This was made from plastic card. On top of this came the folded tri-pod for the TOW.-launcher. The base plates on the real tri-pod can swivel and I therefore folded one down (it’s all in the details…) A tri-pod for the TOW-launcher is also carried on board. It is stored above the left rear wheel hub. The top of the TOW tri-pod goes into a round frame attached to the left side of the rearmost roll bar, while two legs rest in a frame just in front of the ammo can rack. This frame is mounted on a brace, two of which are mounted on the right hand wheel arch. These three frames were made from thin plastic strips. The ones on the right side protect a pressure bottle that is part of the TOW-system, while the vehicle is on the move. The folded tri-pod was enhanced with some details of the extended tri-pod, also offered in Dragon’s M1045/M1046 kit.
The largest item in the trunk is the storage rack for the missiles called Kiveret (bees’ hive). It can hold 12 missiles all together. This item accounted for most of the work. Once finished it stores the missiles in the arrangement of four next to each other and three high. Each level can be folded aside. The braces have half-circle cut outs to prevent the missile rounds from moving. The hive was made from styrene strips (1.0 mm x 1.0 mm) for the top and lower bars and 1.5 mm x 1.0 mm for the two middle bars. The circular cut outs for the missiles were made with the help of a small round file.
I made my own spare TOW rounds, eleven of them (the twelfth is carried in the TOW launcher on my model). I cut out a TOW-end detail on one of the end plates that come with the Dragon kit and used the squash casting technique for creating my own stock of end plates for the rounds. After cutting them out I glued these to 2 mm diameter plastic rod and fitted the rounds in the hive.
After all main parts were painted and the color-indication ring decals were added to the missile rounds, the rounds were glued in place and the whole assembly was detailed.
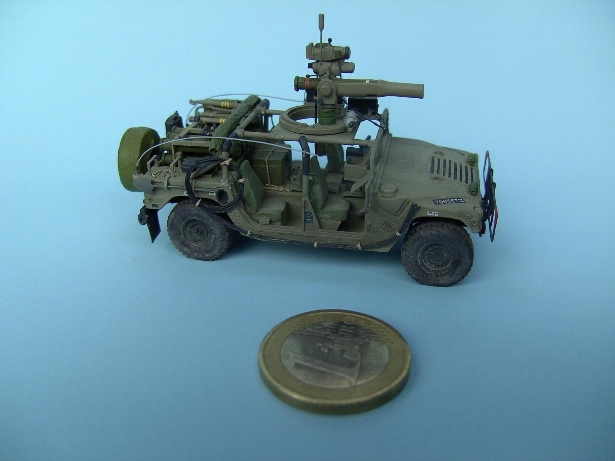
Color
I mixed my own color for this vehicle (I usually do) as I find that no stock color depicts the true color for IDF vehicles. I’m not going to argue on what is right and what is wrong on IDF colors and would like to refer to the www.idf-armour-group.org/groupforum (Link inactive) topics concerning this issue.
The color mix I used was this: 25% Humbrol 72, 30% Humbrol 93, 15% Humbrol 34, 30 % Humbrol 27. Before anyone attempts a kill, please let me explain. I tried straight from the bottle paints and came up with Humbrol 72 and Xtracolor X810 as the two paints that were very, very close to the real thing. Once I started lightening these colors for the scale effect, it turned too grey to my liking. I threw together two ready made mixes I had left a on one-to-one basis, with recipes from Vasko Barbic.
Markings
I wanted to make this model as accurate as possible and that also included the addition of my own decals. The mistake that most people make when building IDF vehicles, is that they slap on the first licence plate they’ll find, which is most likely one for a Main Battle Tank. These start with the number 8. Almost all armored personnel carries and vehicles of the HMMWV family start with a 7. Yes, there is a system!
I made my own licence plates, MLC-shields, technical stencilling and the red-and-white diagonal stripes in Microsoft Word and transferred the various texts onto PhotoDeLuxe Home Edition 4.0. The whole image was printed on white decal paper from Bare Metal. After that a thin layer of flat lacquer was sprayed on (Revell Matt 2, which is really flat and does not darken the color that is sprayed!)
On the spare tire cover, tactical markings are carried. These are made from cloth that is normally stitched onto the cover rather crude. This was simulated by cutting the markings from cigarette paper tape painted buff (still widely available in the Old World). It consists of the letter Gimel, the number 3 and a tactical marking for the Palnat Ha’Tzanchanim, the Airborne Brigade’s anti-tank company.
The model was lightly weathered using pastels and sealed with the came lacquer as the printed decal image.
Figure
The figure depicts a friend of mine, Koby Harati, who served his compulsory military duty with the Palnat Ha´ Tzanchanim, the paratroopers´ anti-tank company. The figure is made up of parts of various Preiser figures and two Hasegawa arms. The hair-do was altered, using Magic Sculp. I also added a red kipah (skull cap). The personal weapon carried is the M4A1 rifle (aka "flat-top", or in Hebrew: 'FLETOP'). I had scratch built these before and they are now on offer in an IDF weapons set from Modell Trans (www.modelltrans.de). The figure is also armed with a Canon EOS digital camera, just like the real thing. Just like Koby, the figure also has glasses, which were fashioned by bending very thin metal wire over two small pins. Koby made this model possible by providing me with all the pictures I needed and I added him.
Conclusion
I have really enjoyed making this model, even though at certain times I wondered why I even started doing it. The project has consumed a lot of time and patience and a lot of time was spent studying the references at hand. This project has taught me a lot of new techniques and skills. Next project? A Hamer Memugan, the Israeli counterpart to the M1114.
References
www.orev.co.il (you might have to install a Hebrew font to check out the site)
http://www.tpub.com/content/hummer/TM-9-2320-280-20-3/index.htm (Link inactive)
https://atiam.train.army.mil/soldierPortal/atia/adlsc/view/public/6950-1/fm/3-22.34/TOC.HTM (Link inactive)
With the kind assistance of Koby Harati
See more on IDF material on www.idf-armour-group.org (Link inactive) |
| Copyright: Erik Hendriks September18, 2007 |