![]()
![]()
![]()
![]()
![]()
|
| Please Support our Sponsors |
 |
 |
||
 |
|
Model Review
1/35 Kinetic Model Kits
4x4 MRAP (MaxxPro) Armoured Fighting Vehicle
By Patrick Keenan - Editor
.jpg)
Basic Item Information
|
Item |
4x4 MRAP (Maxx Pro) Armoured Fighting Vehicle |
|
Stock Number |
K61011 |
|
Manufacturer |
Kinetic Model Kits (Owned by former WarWheels.net Sponsor: Lucky Model) |
|
Scale |
1/35 |
|
Medium |
Injection Molded Styrene Plastic |
|
Kit Contents |
(296) Light Grey plastic parts (46) Clear plastic parts (8) Black vinyl wheels & hubs (28) Brass photo-etched parts |
|
Retail Price |
$39.99 (from Lucky Model) |
|
Reviewer |
Patrick Keenan - Editor |
|
Review Date |
September 9, 2014 |
Review Summary
|
Review Type |
Full Build Review (In Process) |
|
Basic Positive Features |
Basic detail & shape of the vehicle appear to be replicated correctly; Kit subject matter welcome addition due to high visibility and use of real vehicle. |
|
Basic Negative Features |
None Noted at this Time |
|
Recommendation |
Highly Recommended |
___________________________________________________________________________________________________
|
___________________________________________________________________________________________________ Detailed Review First
of all, to be up front with you all, Lucky Model (owner of Kinetic Model
Kits) WAS a sponsor of WarWheels.net when I started this build.
With that
being said, we can start with the model review. Ever since the mid-2000’s the number of Mine
Resistant Ambush Protected (MRAP) vehicles fielded by the World’s
military organizations has increased dramatically. With the MRAP’s
higher visibility in the “real world”, the demand for model kits of
those vehicles has also increased. Unfortunately, until only
recently have we been provided with model kits of these vehicle types
and they still remain few and far between. However, Kinetic Models is increasing the number of
MRAP model kits available yet again with their newest 1/35 release, the
“4x4 MRAP Armoured Fighting Vehicle”. Since the kit name doesn’t tell you
much on its own, I’ll add that the vehicle represented is the NAVISTAR
Defense Maxx Pro MRAP; the company’s first production model in the
series. At this point of the review, you might be expecting a bit of background information on the “real” Maxx Pro vehicle. However, you won’t be getting any as I don’t usually provide background information regarding the applicable real vehicles in my model kit reviews. However, if you are interested in some basic information about and photographs of the Maxx Pro we already have a lot of information and photos available about it here at Warwheels.Net. Kit Accuracy The accuracy of the model kit will be determined and
addressed here once the kit construction is completed. Stay tuned. Quality/Detail of Parts The quality of the casting of the plastic kit pieces
is very good. There is only a little flash present on some of the
parts, and the smallest pieces are also well cast, crisp and clean.
There are a few mold punch-out holes present on some parts, but they
mostly appear in the hard to see/reach areas. The detail level of the individual plastic parts is
good, but not great as they seem a little bit soft on detail when
compared to kits done by other manufacturers. However, it appears
that the main details of the real vehicle are there and the basic shapes
look good as well. As for the detail level of the vinyl tires, and
photo-etched brass pieces; they are very good to excellent. The
tread pattern and detail of the tires is exceptionally done.
Another interesting point regarding the vinyl tires is that they are
provided by Kinetic separately; not attached to a “sprue”. The result is
tires that do NOT have any attachment points on them to remove. As we
all know, vinyl attachment parts are sometimes difficult to remove
without damaging the tires. I have to say that these vinyl tires
are some of the best I’ve seen in terms of detail AND ease of clean up. The detail level of the photo-etched parts looks to
be very good as well. In addition, Kinetic has increased the
number of photo-etched pieces they’ve included in the Maxx Pro when
compared to their other armor models I’ve seen. The quality and
quantity of PE parts will substantially increase the detail level of the
finished model as they can often more accurately replicate certain fine
details than injection molded parts. Please note that I cannot yet provide my final assessment of detail level of the kit due to the fact that I’m in the middle of the build portion of my review. Stay tuned for the possibility of changes and/or additional information being posted here as I continue the construction of the model kit. Decals, Markings &
Painting Information The decals Kinetic provides seem to be of very good
quality. They were researched by Bison Decals and printed by
Cartograph. The decals are printed in register in vibrant color
and look to be sufficiently thin enough to work well. However,
until I actually use them on the completed model, I’ll reserve full
judgment until then. Two marking options are
included with the kit, both representing Instructions/Packaging I believe that kit instructions are one of the most
underappreciated, yet most important aspects of hobby modeling. A
bad set of directions can cause unnecessary grief with an otherwise well
designed and engineered kit. On numerous occasions I have
struggled with a kit assembly only to figure out the solution by
accident. Afterwards, I’ll suddenly think, “That was easy once I got it.
Gee, why didn’t company X just show that better in the instructions?” Based upon observations made during my initial “in box” review and during my initial experiences with the construction of the model kit, Kinetic’s instructions are very good. Although there have been a couple small errors I’ve discovered within the instructions, I didn’t encounter any major problems, omissions or overly complicated processes during the model build. Of course, that conclusion might change after I’ve finished building the model kit, but that remains to be seen. I’ll update this portion of the review (if need be) as I continue the construction of the model kit. Anyway…the drawings themselves aren’t anything
special, but the design of the directions is utilitarian; they look to
be easy to follow and understand, especially considering the complexity
of some parts of the real Maxx Pro. The diagrams for each
individual step are very specific as to what part goes where. When
practical, Kinetic includes directional arrows from one piece and go all
the way to another so as to leave no doubt where everything fits.
Sometimes, kit manufacturers include arrows, but they stray off in a
general direction and leave much guesswork as to where they go. Kinetic provides 17 steps in the instructions to
complete the Maxx Pro and there is generally enough room in each step to
facilitate ease of understanding. Most of the instruction steps are
clear and uncluttered and need minimal review. Some companies
knock down the total number of steps to a bare minimum but include way
too much information in each step to clearly understand what to do. Or
just as bad, they give a zillion sub-steps that further complicate
matters. Some instruction sheets are so confusing they make an
otherwise fun time into a true nightmare. However, these
instructions seem perfectly fine, but as I stated before, I’ll have to
reserve final judgment on the quality of instructions until I complete
the model kit build. Finally, Kinetic provides very good kit packaging and
“safety” by utilizing a box constructed of relatively sturdy cardboard.
They also follow the practice of bagging all sprues, decals and PE
separately. They’ve also included a small cardboard piece to further
protect the PE frets. One interesting aspect of their packaging is
the inclusion of re-sealable bags for all the parts. Although not
necessary, it is a nice touch if you’re like me and take joy in fondling
the model parts a bit before putting the kit on the “to do” shelf. Fit of Parts So far during the initial steps of the model construction, I’ve found the fit of the parts to be very good. I’ve only encountered a few slight fit issues so far, and they have been easily remedied. Otherwise, the parts have gone together very well and seem to line up correctly with no problems. Considering the complexity of some of the final sub-assemblies (specifically the chassis and frame), this fact is even more commendable. With that being said, my final assessment of the fit of the model kit parts will be determined and addressed here once the kit construction is completed. Stay tuned. Kit Construction Steps 1-4: Chassis,
Suspension and Lower Hull Now, on to the build process of this beastie.
Not surprisingly, I started with STEP 1 and pretty much followed the
instructions verbatim through the end of STEP 4. The only times I
deviated from the instructions was when I decided to leave parts off for
application later so as to make handling the vehicle safer or painting
easier. Some of these omitted parts to be added later are tow
shackles (C14), wheel discs (E18) and exhaust screens (PE-1 &2). To be honest, when I scanned the instructions before
starting my build, this sub-assembly of the model kit looked
intimidating. This portion of the real vehicle is complicated and
this model kit represents that same potential head-ache, but in
miniature. There’s a pant-load of parts going every which way, so
there’s a lot that could go wrong. Plus, if the alignment of the chassis
or suspension is incorrect, you’re in for a world of hurt for the entire
project. However, I found that with careful review of the instructions
and some basic dry fitting, this potentially difficult part of the model
construction went very well and did not cause any undue stress. At
least, I think so for the time being… However, even during the smoothest of model projects,
we find little nits and picks that can throw us off course a wee bit.
So, to help you out in your Kinetic MaxxPro construction journey, here
are a few tips/lessons I learned while working on STEPS-1-4. STEP 1 – Obtain the correct frame alignment is a bit
tricky. Take your time and make sure everything is “square”
(corners at 90 degrees). Otherwise, you’ll have alignment problems
later. STEP 2 – Two totally different pieces are listed in
the instructions AND on the parts sprue as C15 (filter halves).
Consult the illustration in the instructions to help determine which is
which; it’s pretty apparent when comparing the two parts. Also,
Part C27 (exhaust pipe) is shown being glued into the top hole of Part
B58. However, it should actually go in the bottom-left hole
instead. Part C9 should actually go into the top hole. STEP 3 – Fit of Parts C5/C6 (Wheel Wells) and B8/B9
(lower hull armor) is not great and can cause alignment problems later.
Be extra careful on alignment of parts here. Please note: I usually wait until the end of the build process to paint my model kits. However, due to the number of parts and complexity of the chassis, suspension, & hull sub-assembly I decided I needed to do a “preemptive strike” with the airbrush so as to make my final base coat application easier. I applied a coat of Vallejo Surface Primer "Desert Tan Base" (73.613)* just before adding Part D24 – Underbody Armor Plate. I then added the remaining parts in this step and moved on to… STEP 4 – Final fitting
of E1/E3 sub-assemblies to lower hull/chassis/frame could be very
tricky. However, this problem can be avoided if you
dry fit the upper
truck hull (Sprue A), to the lower hull and then fit the sub-assemblies.
It worked very well for me and once done, I removed the upper hull and
put it back in the box for later.
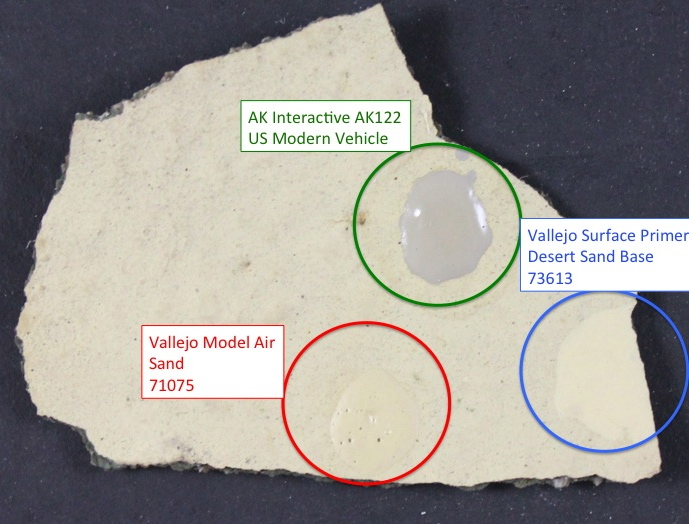 *
The photo to the left (via John
Charvat), is of an actual piece of US Military equipment that is painted
the "standard" CARC 686 Desert Tan (FS 33446). However, it is actually closer in
color to FS 33531; which matches the Vallejo Paints I decided to use.
Note: other equipment/vehicles have been documented as being painted in
a color which more closely resembles the "standard" US FS 33446 color. Whether
the color difference is due to use/the elements or due to
inconsistencies in paint manufacturing, has not been determined.
*
The photo to the left (via John
Charvat), is of an actual piece of US Military equipment that is painted
the "standard" CARC 686 Desert Tan (FS 33446). However, it is actually closer in
color to FS 33531; which matches the Vallejo Paints I decided to use.
Note: other equipment/vehicles have been documented as being painted in
a color which more closely resembles the "standard" US FS 33446 color. Whether
the color difference is due to use/the elements or due to
inconsistencies in paint manufacturing, has not been determined.
Conclusion So far based upon my “first look” assessment
and initial experiences while building the model kit, Kinetic
has done a very nice job on their Maxx Pro MRAP model kit.
Kinetic’s choice of releasing a kit of this well-known and highly
utilized vehicle is a welcome addition for us wheeled fighting vehicle
modelers. Although the model kit appears a bit soft on the detail
level of individual parts, they are otherwise well cast: crisp and
cleanly molded. In addition, the basic detail and shape of
the vehicle appear to be replicated correctly. Stay tuned for further developments with this review as I continue the construction of the model kit. Highly Recommended Thanks to
Lucky Model/Kinetic Models for the
review sample. |
Copyright: Patrick Keenan - September 2014 |

.jpg)
.jpg)
.jpg)
.jpg)
.jpg)
.jpg)
.jpg)
.jpg)
.jpg)
.jpg)
.jpg)
.jpg)
.jpg)
.jpg)
.jpg)
.jpg)
.jpg)
.jpg)
.JPG)
.JPG)
.JPG)
.JPG)